EgoSense H6 User Manual
This manual is for device operators. A single Windows PC (with EGOTool and Foxglove Studio installed) is all you need to record, view and export data — no command line, Python or Linux required.
Package Contents
| No. | Item |
|---|---|
| 1 | EgoSense H6 device (a Micro SD card is pre-installed) |
| 2 | EgoSense magnetic battery |
| 3 | Charger |
| 4 | Charging cable |
| 5 | Battery charging accessory |
- A Windows PC with EGOTool and Foxglove Studio installed
- A USB Type-C data cable (for live preview on the PC)
- A card reader (for exporting data)
Getting to Know the Device
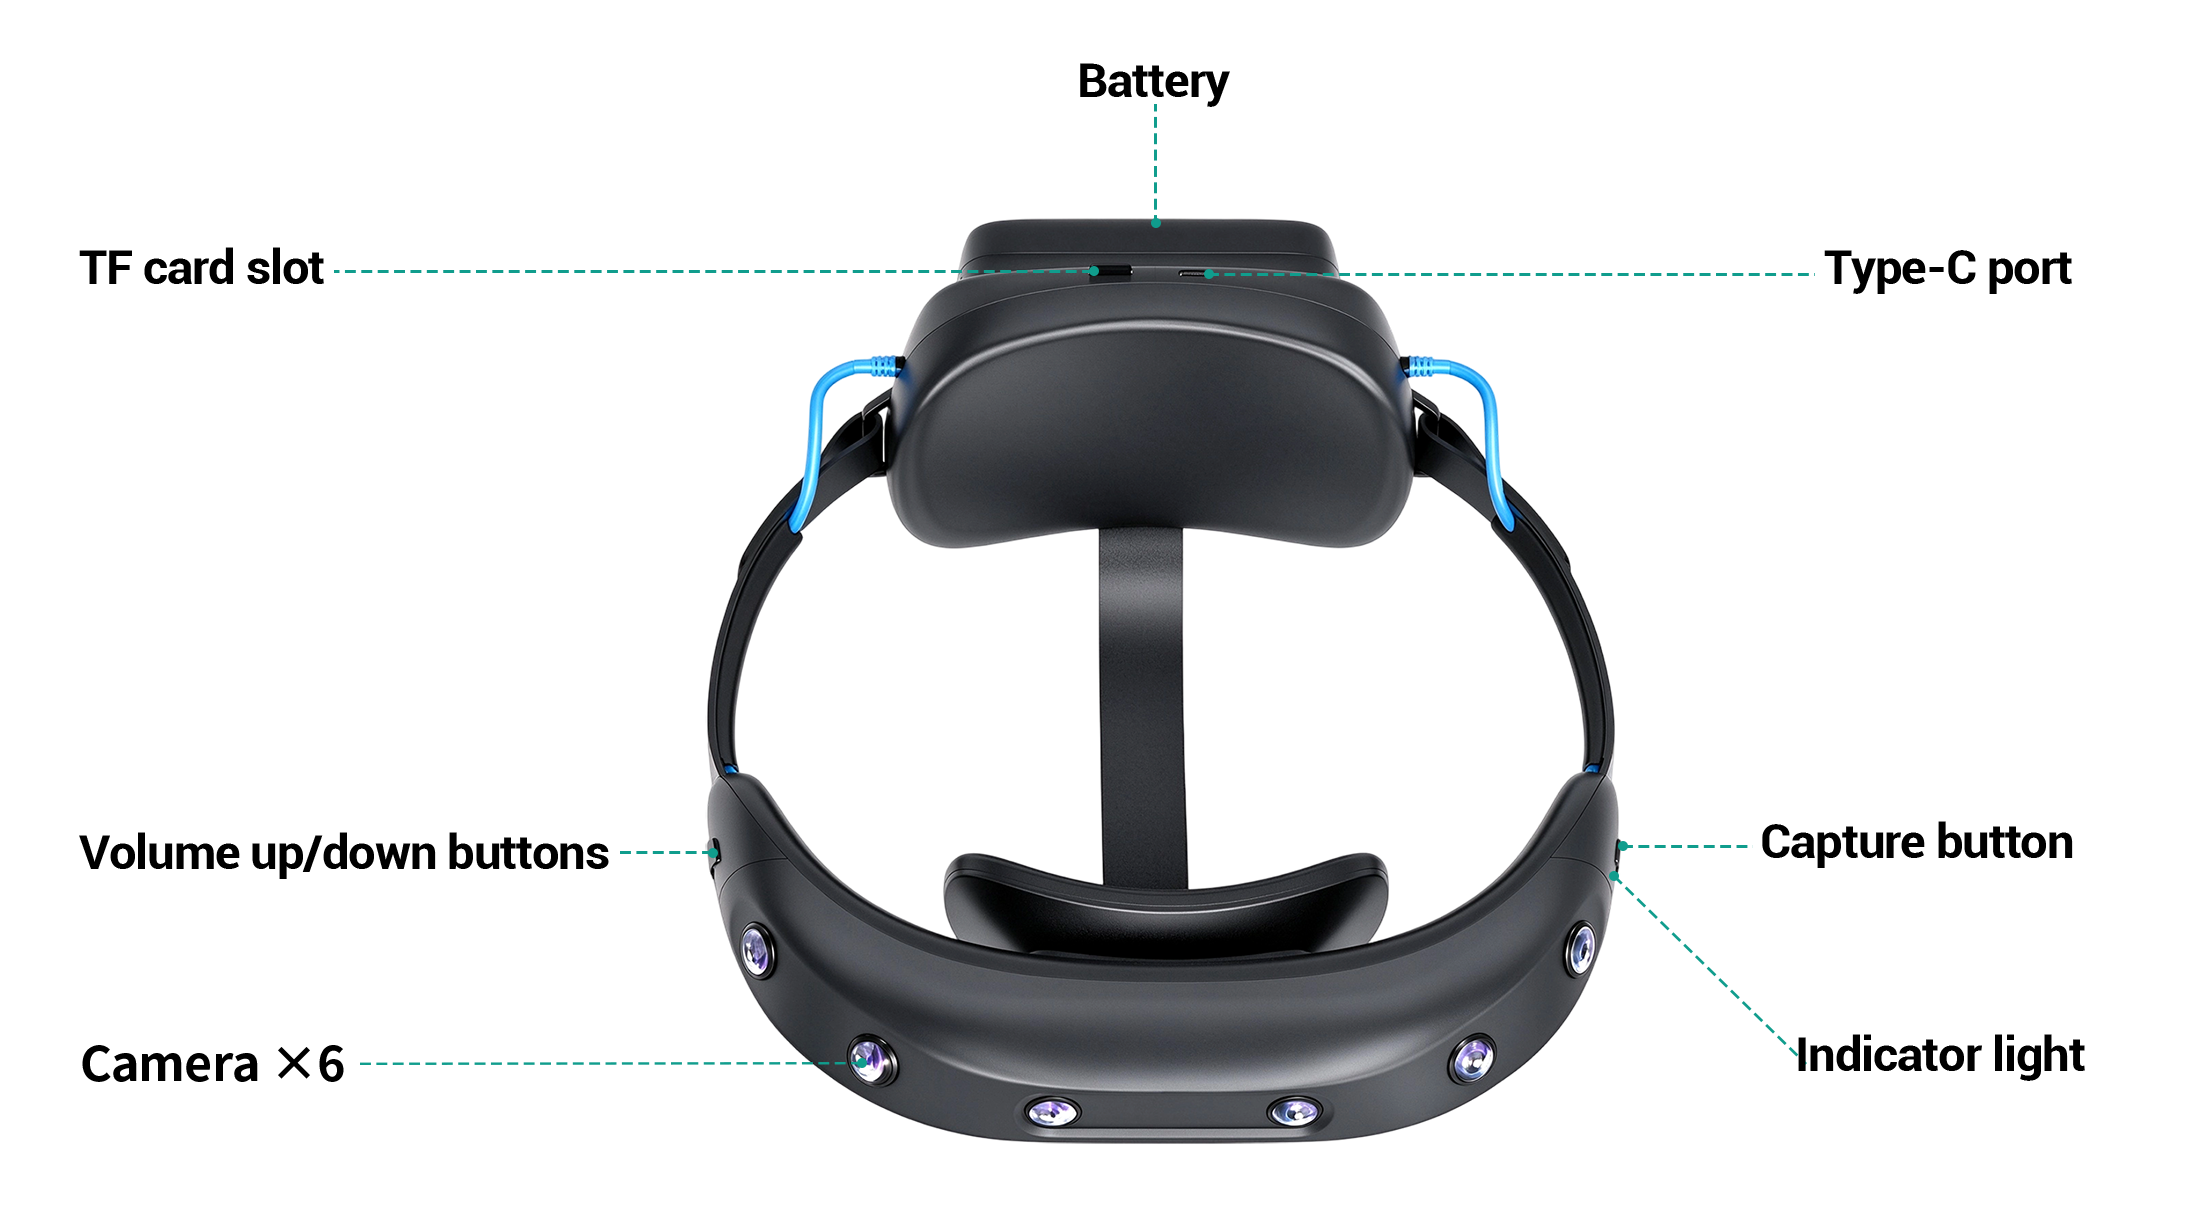
| Part | Description |
|---|---|
| Six cameras | Two front-facing lenses (stereo) plus two lenses on each side, capturing 6 video streams. Keep the lenses clean and unobstructed while wearing the device. |
| Head pose sensor (IMU) | Records head orientation and rotation. No operation needed. |
| Record button (capture button) | On the right side of the headband. Starts / stops recording, with a voice prompt. |
| LED indicator | Next to the record button. Lights up when powered on; purple while recording, white after recording stops. |
| SD card slot (TF card slot) | At the rear of the device. Recordings are saved to the Micro SD card (pre-installed at the factory). |
| USB Type-C port | At the rear of the device. Connect to a Windows PC for live preview and control with EGOTool. |
| Magnetic battery | Snap-on magnetic battery; the device powers on as soon as it is attached. |
| Volume up/down buttons | On the opposite side from the record button. Adjust the voice prompt volume. |
Device status (battery level, temperature, SD card usage, etc.) can be viewed in EGOTool.
SD Card Selection and Preparation
A Micro SD card is included with the device, and an SD card must be inserted to record. If you replace it, note the following:
- File system: format as exFAT.
- Capacity: ≤ 256 GB recommended.
- Choosing a card: counterfeit and low-grade cards are common. Fake or incompatible cards can cause the SD card not to be detected or the device not to record.
- ✅ Tested and working: MoveSpeed A1 V30, Biwin, etc. Buy from reputable sellers.
- ❌ Known incompatible: some SanDisk A1 / V10 consumer cards do not work with this device.
- Verify real capacity (recommended): before first use, check new cards with H2testw on Windows to confirm the real capacity and avoid corrupted recordings caused by fake-capacity cards.
Power On, Record and Power Off
- Make sure the SD card is inserted.
- Attach the magnetic battery. The device powers on and the LED lights up.
- (Optional) Connect the device to a Windows PC with a Type-C data cable and open EGOTool for live preview — see Connecting EGOTool.
- Press the record button. A voice prompt announces that recording has started and the LED turns purple. You can also click the Start recording button in EGOTool.
- When finished, press the record button again. A voice prompt announces that recording has stopped and the LED turns white. Wait until the recording is saved, then remove the battery.
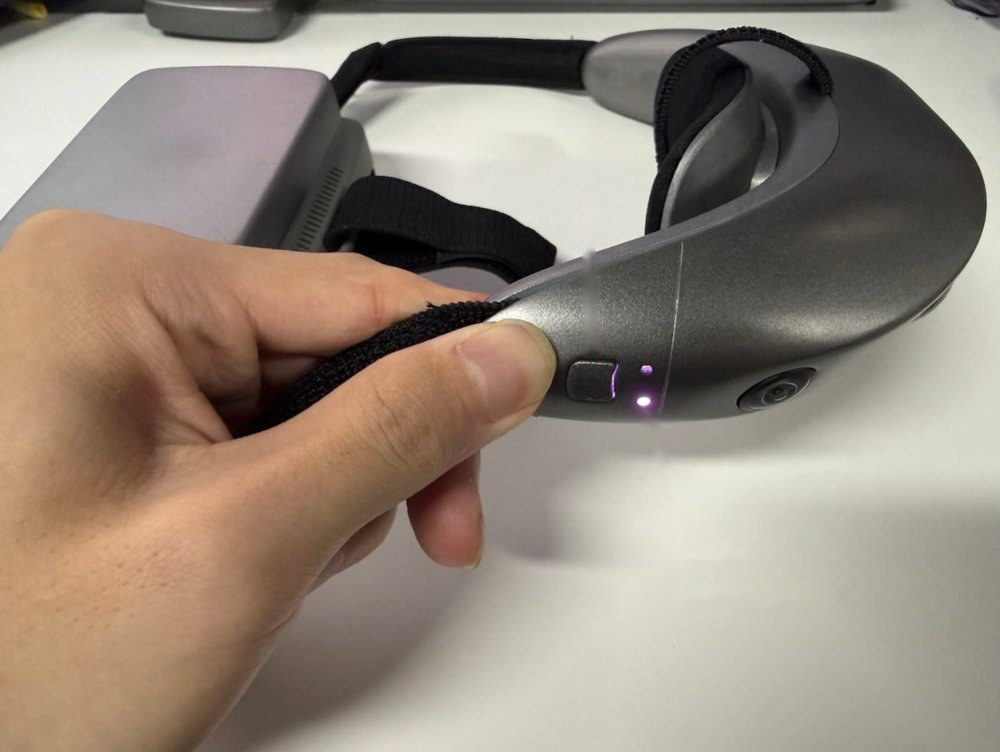
- 1LED is purple
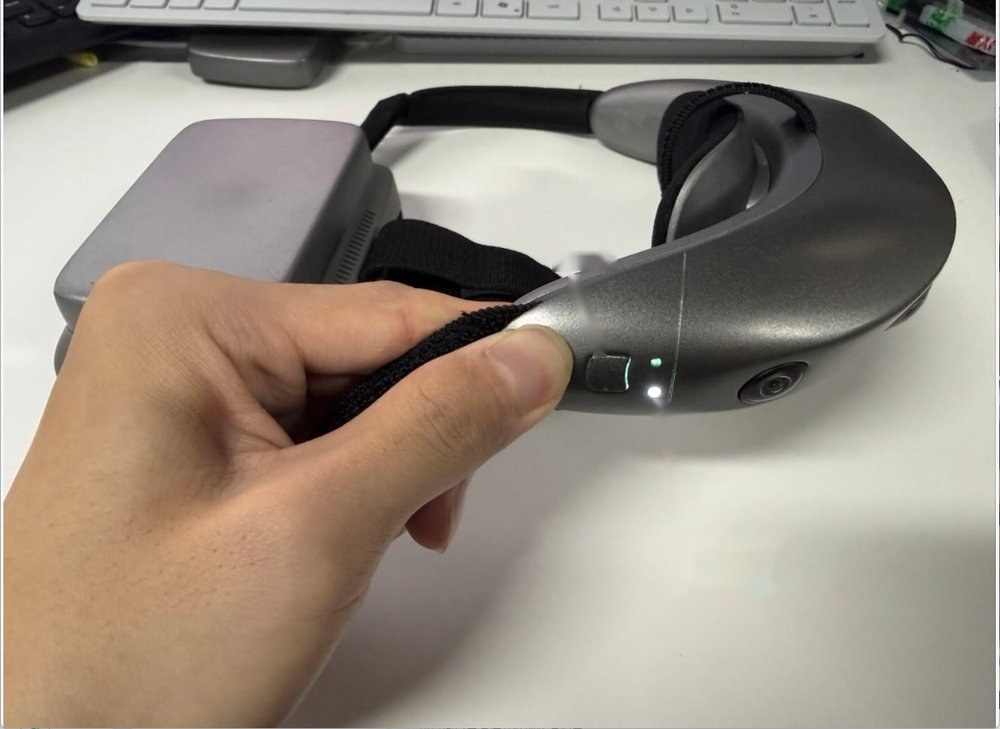
- 1LED is white
Stop recording and wait until the file is saved before removing the magnetic battery. Never cut power while recording, or the data being written may be lost.
Charging
- A fully charged battery lasts about 3 hours.
- When the battery is very low, connecting a Type-C charger directly to the device will not charge it. Remove the battery and charge it with the battery charging accessory.
Connecting EGOTool
EgoSense H6 uses the Windows host software EGOTool for live preview and recording control.
Install EGOTool
- Package:
EGOTool_V1.0.3.zip(see Downloads). - Unzip it — no installation needed — and double-click
EGOTool.exeto run it.
EGOTool currently has a Chinese interface only. The screenshots below are annotated in English, and the EGOTool interface glossary explains every button and field.
Configure the PC Network
Over USB Type-C, the device appears on the PC as a virtual network adapter. Give this adapter a static IP address on the same subnet as the device.
-
Attach the battery to power on the device, and connect the device to the PC with a Type-C data cable.
-
On Windows, open Settings → Network & internet → Ethernet and find the newly added network.
-
Change the adapter's IP assignment to Manual and enter:
Item Value IPv4 address 192.168.140.21(any unused address on the same subnet, but not the device IP192.168.140.20)Subnet mask 255.255.255.0
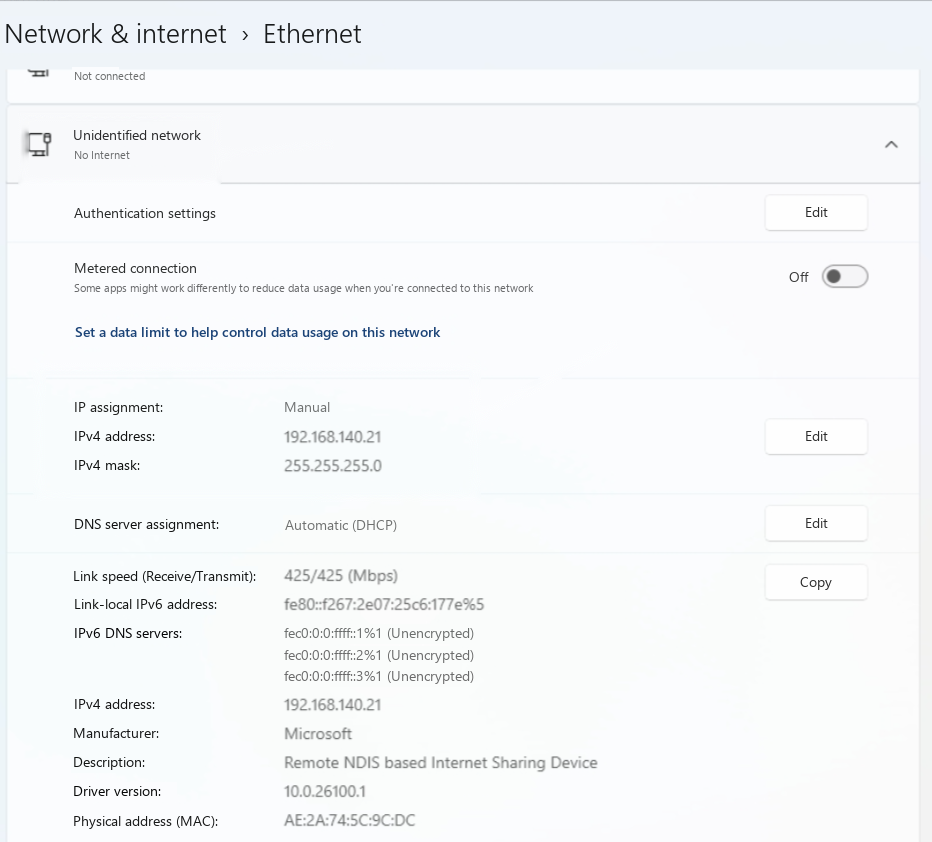
- 1The device adapter shows as "Unidentified network, No Internet" — this is normal
- 2Set IP assignment to Manual and enter the IPv4 address and subnet mask
Connect to the Device
Open EGOTool, check the settings on the Communication tab, then click Connect device:
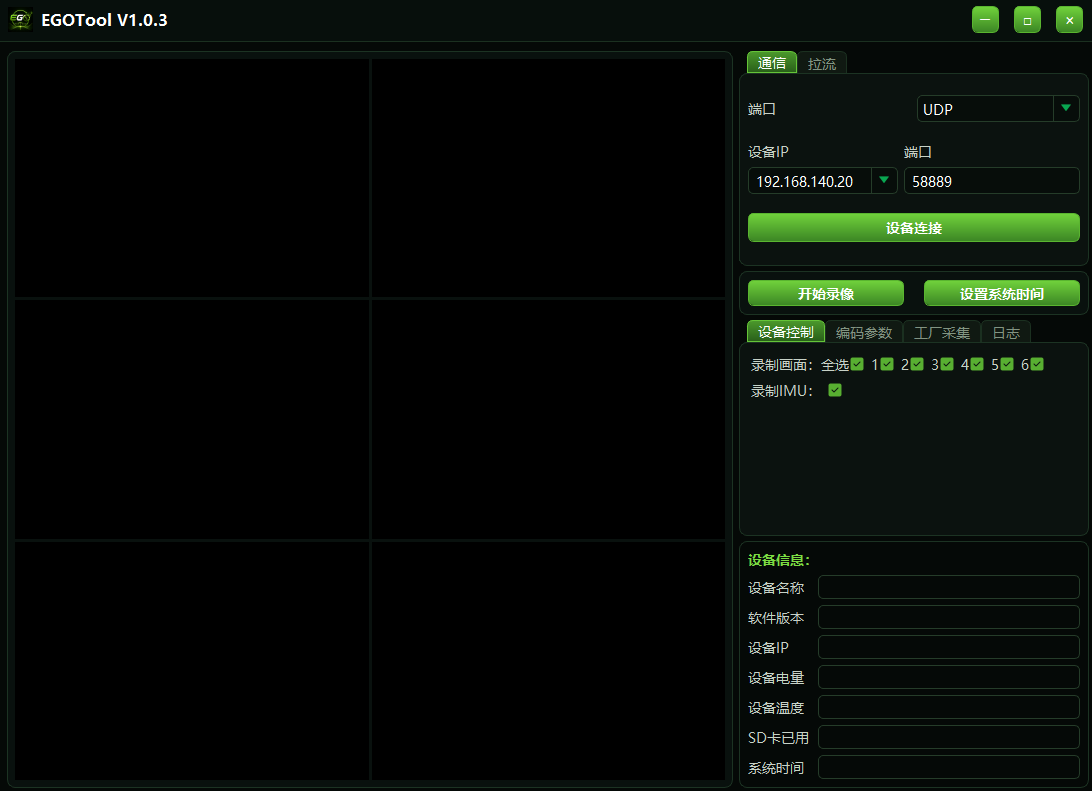
- 1Protocol UDP, device IP 192.168.140.20, port 58889
- 2Click Connect device
Live Preview and Recording
Once connected, EGOTool shows the six live camera views and the device status:
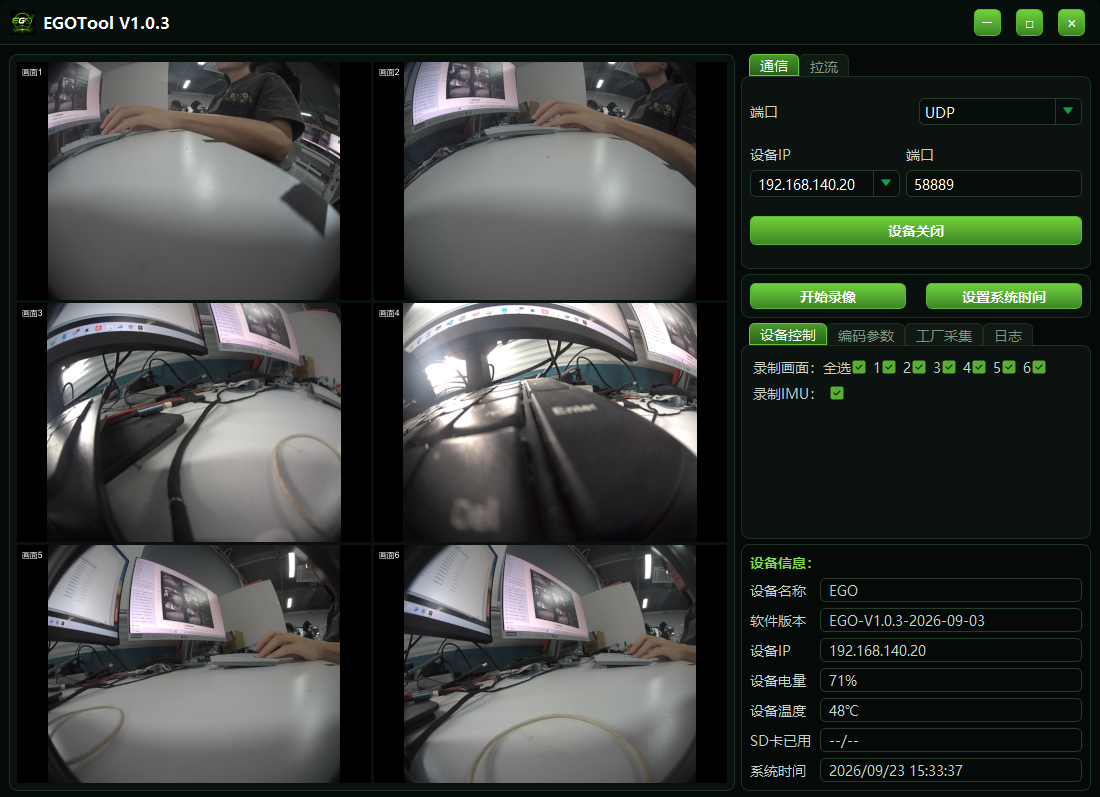
- 1Live view of the six cameras
- 2Start / stop recording
- 3Tabs: Device Control / Encoding / Capture Info / Log
- 4Device info: name, software version, IP, battery, temperature, SD card usage, system time
There are two ways to control recording:
- Press the record button on the right side of the device to start / stop recording; a voice prompt confirms each action.
- Click Start recording in EGOTool.
EGOTool tabs:
| Tab | Description |
|---|---|
| Device Control | Select which camera channels (1 ~ 6) to record and whether to record the IMU. |
| Encoding | View and set the recording resolution (default 1600 × 1300), bitrate, frame rate, codec (H.265) and container format, then click Save. |
| Capture Info | Enter task, location, notes and operator, then click Apply. The information is written into the next recording. |
| Log | View the device log. |
See the EGOTool interface glossary for annotated screenshots of each tab.
Live preview is only for checking the image, focus and framing — it is not saved. The recording on the SD card is the source of truth.
EGOTool Interface Glossary
EGOTool's interface is in Chinese. Use the numbered callouts below to find each button and field.
Main window
- 1Communication tab
- 2Stream tab
- 3Protocol (UDP)
- 4Device IP (left) / Port (right)
- 5Connect device (changes to Disconnect device once connected)
- 6Start recording
- 7Set system time
- 8Tabs, left to right: Device Control / Encoding / Capture Info / Log
- 9Recorded channels: Select all, channels 1–6
- 10Record IMU
- 11Device information, top to bottom: device name, software version, device IP, battery level, device temperature, SD card used, system time
Tabs
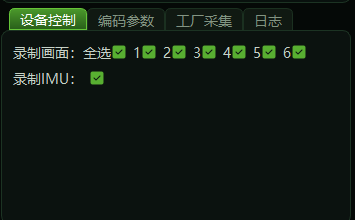
- 1Recorded channels: Select all, channels 1–6
- 2Record IMU
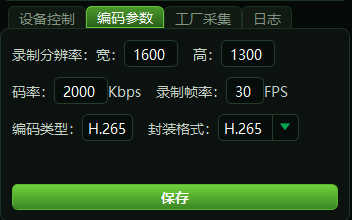
- 1Recording resolution: width / height
- 2Bitrate (Kbps) / Recording frame rate (FPS)
- 3Codec / Container format
- 4Save
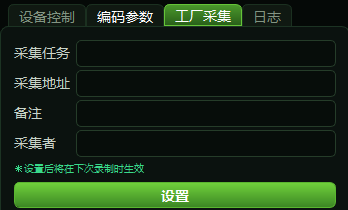
- 1Task
- 2Location
- 3Notes
- 4Operator
- 5Settings take effect from the next recording
- 6Apply
Exporting Data to a PC
Recordings are saved to the SD card as .mcap files.
- After stopping the recording, remove the battery to power off the device, then take the SD card out from the rear of the device.
- Connect the SD card to a Windows PC with a card reader.
- Copy the
.mcapfiles to the PC. We recommend one folder per recording session.
After copying and checking the data, delete the exported recordings from the SD card to free up space for new recordings.
Viewing Recordings in Foxglove Studio
.mcap files are viewed with Foxglove Studio — no command line needed.
The Foxglove screenshots below were taken with the Chinese interface. The English interface has the same layout.
- Download and install the Foxglove Studio desktop app from foxglove.dev. You need to sign up and sign in with an email address the first time you use it.
- On the framework selection screen, choose ROS 2:
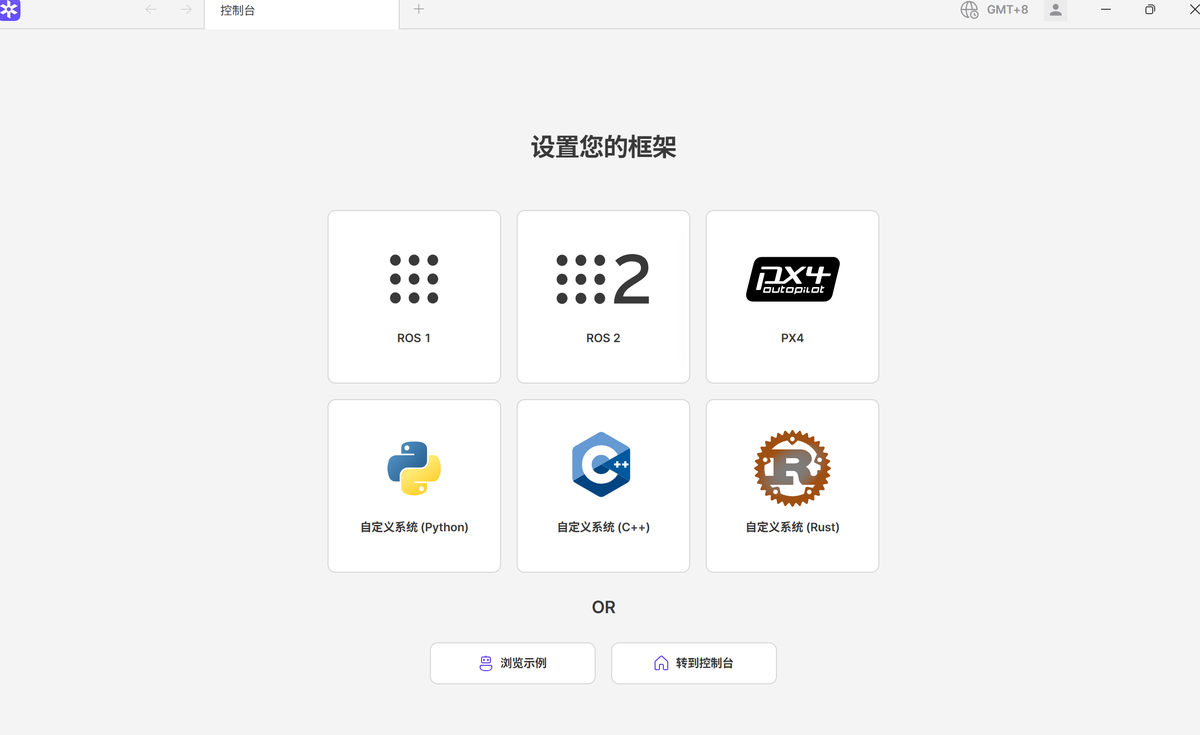
- 1Select ROS 2
- Switch to the tab for playing back recorded data, click Open and select the copied
.mcapfile (or drag the file into the window):
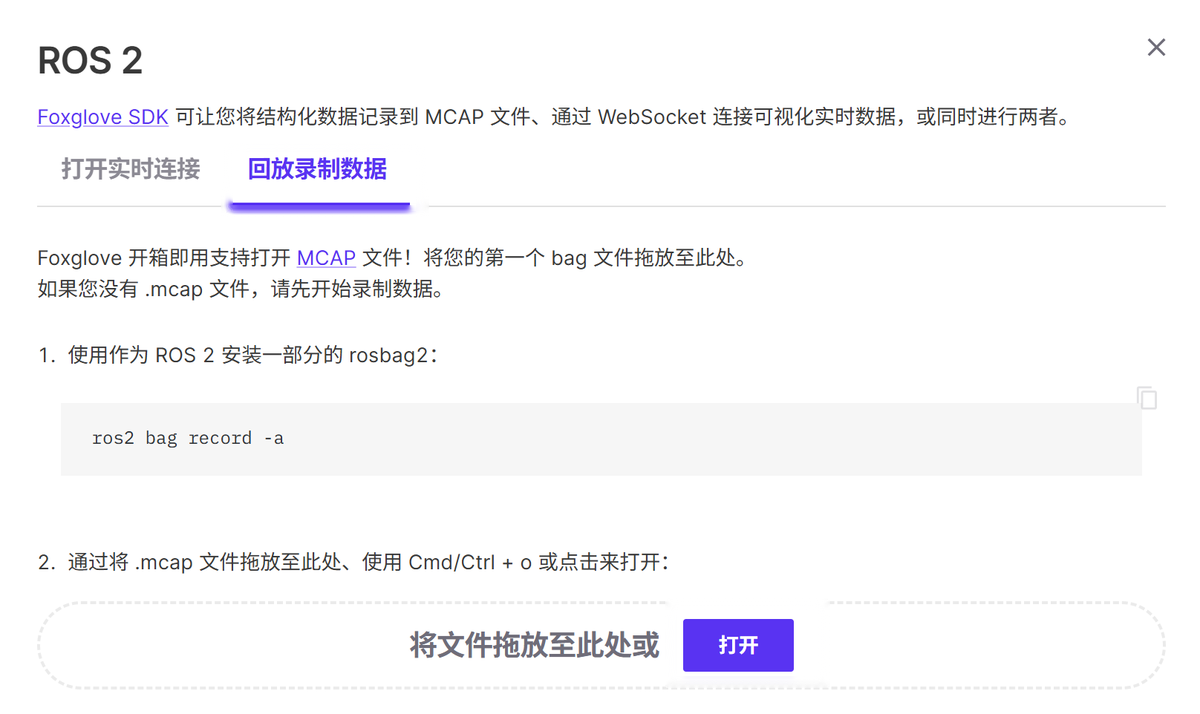
- 1Switch to the recorded-data playback tab
- 2Click Open and select the .mcap file
- The main view is empty after the file opens. Import the layout file
Ego-Foxglove-Layout.json(see Downloads): click the layout button at the top right and choose Import from file…:
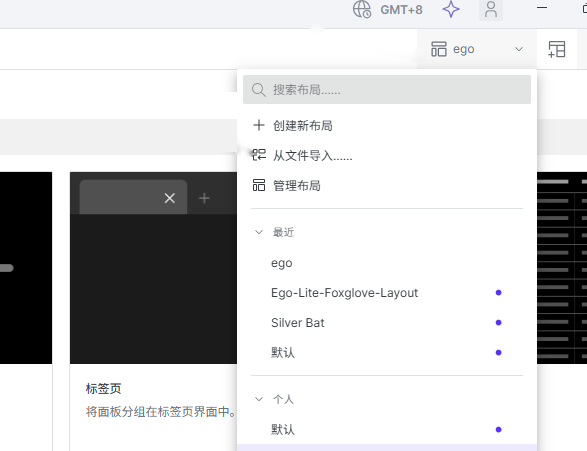
- 1Click the layout button at the top right
- 2Choose Import from file… and select Ego-Foxglove-Layout.json
- After importing, the six camera views appear, and the data topics in the recording are listed on the left:
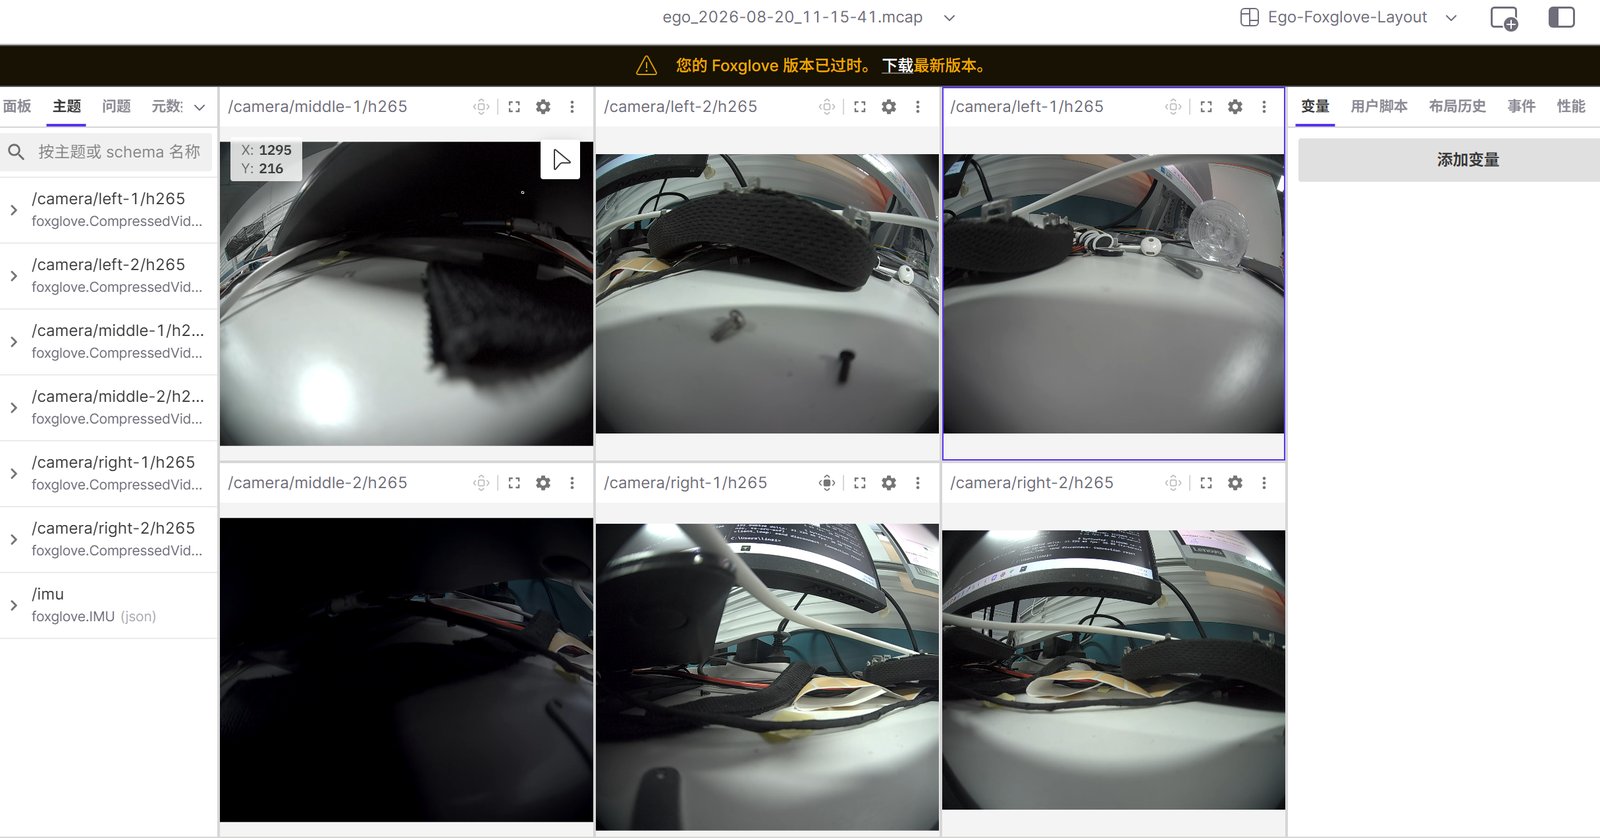
- 1Topic list (6 cameras + IMU)
- 2Current layout
Topics in the recording:
| Topic | Message type | Description |
|---|---|---|
/camera/middle-1/h265, /camera/middle-2/h265 | foxglove.CompressedVideo | Front stereo cameras |
/camera/left-1/h265, /camera/left-2/h265 | foxglove.CompressedVideo | Two left-side cameras |
/camera/right-1/h265, /camera/right-2/h265 | foxglove.CompressedVideo | Two right-side cameras |
/imu | foxglove.IMU | 6-axis IMU data |
- Foxglove Studio decodes H.265 natively; no plugin is needed.
- You can skip the layout file, but you will need to add panels manually.
- Foxglove Studio is for recorded
.mcapfiles; use EGOTool for the live view.
Downloads
| File | Size | Description |
|---|---|---|
| EGOTool_V1.0.3.zip | ~70 MB | Ego host software for Windows. Unzip and double-click EGOTool.exe |
| Ego-Foxglove-Layout.json | ~7 KB | Foxglove Studio layout file, imported via Import from file… |
| 2026-08-20_11-15-40.zip | ~183 MB | Sample recording (.mcap) you can explore in Foxglove Studio before purchasing |
If you have trouble downloading, contact technical support: support@sensing-world.com.
FAQ
If you run into problems, see the EgoSense H6 FAQ.