CIG4-8H Application
How It Works: The Complete Video Injection Process
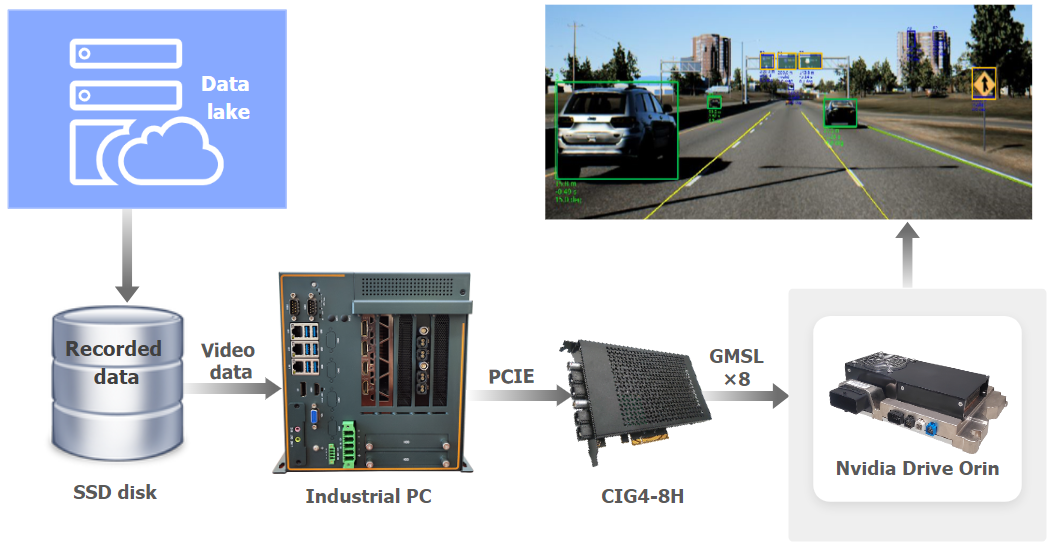
Block diagram of Intelligent driving data injection system
Data Preparation
Load pre-recorded camera data or simulation data for algorithm validation into the host PC memory
GMSL Signal Generation
CIG4-8H card generates authentic GMSL signals identical to real camera outputs, including timing and electrical characteristics
ECU Integration
Target ECU receives video data through standard GMSL deserializers, processing it as if from real cameras
System Architecture
- IPC (Industrial PC): Provides the source video data through PCIe Gen3 interface.
- CIG4-8H Video Injection Card: Receives data from IPC, processes it based on timestamps, and outputs synchronized video streams.
- ACU (Autonomous Control Unit): Receives the injected video data for testing and validation purposes.
Software Setup and Configuration
1. Installation Dependencies
System Requirements and Dependencies:
sudo apt-get update
sudo apt-get install openssh-server
sudo apt-get install libtool
sudo apt-get install git vim sshpass
2. SDK Download
Select the appropriate SDK package based on your operating system and CIG4-8H hardware version:
| Operating System | Hardware Version | SDK Version | Download Link | Download Tool |
|---|---|---|---|---|
| Ubuntu 18.04 LTS Ubuntu 20.04 LTS | CIG4-8H v1.0 | SDK v2.1.0 | Download | DownGit |
DownGit allows you to download specific folders or files from GitHub repositories without cloning the entire repository:
- Copy the GitHub repository URL from the "Download Link" column
- Open DownGit in your browser
- Paste the repository URL into the input field
- Click "Download" to get a ZIP file containing the SDK
- Extract the ZIP file to your desired location
This method is particularly useful when you only need the SDK files without the full Git history.
3. FFmpeg Environment Setup
Download FFmpeg: ffmpeg-4.4.4.tar.xz (9.12MB)
Installation Steps:
-
Extract the package:
tar -xf ffmpeg-4.4.4.tar.xz -
Install development libraries:
sudo apt-get install libsdl2-dev
sudo apt-get install libsdl1.2-dev
sudo apt-get install x264 libx264-dev -
Configure and compile FFmpeg:
sudo ./configure --prefix=/usr/local/ffmpeg --enable-shared --disable-static --disable-doc --enable-ffmpeg --enable-ffplay --enable-ffprobe --enable-gpl --enable-libx264 --enable-nonfree --disable-x86asm -
Build and install:
make -j8
sudo make install -
Configure environment variables:
vim ~/.bashrcAdd the following lines:
export PATH="$PATH:/usr/local/ffmpeg/bin"
export CPATH="$CPATH:/usr/local/ffmpeg/include"
export LD_LIBRARY_PATH="$LD_LIBRARY_PATH:/usr/local/ffmpeg/lib" -
Apply configuration:
sudo ldconfig
4. Software Architecture Overview
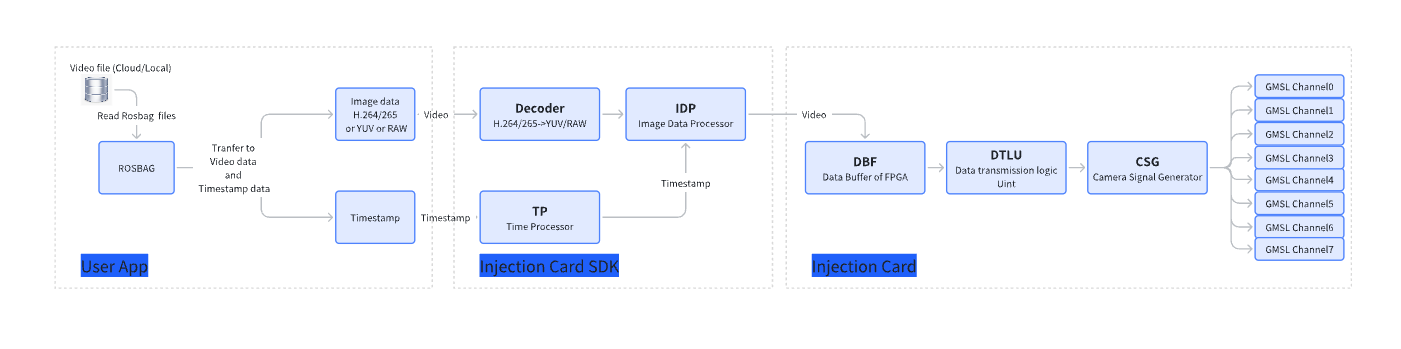
Software Framework Architecture
Architecture Components:
The software architecture consists of multiple processing stages optimized for high-throughput video injection:
- Video Input Processing: Handles various input formats including H.264, H.265, JPEG, YUV422, and RAW formats
- GPU Acceleration: Utilizes CUDA for real-time format conversion and processing
- FPGA Interface: Direct communication with onboard FPGA for low-latency video streaming
- Multi-channel Synchronization: Ensures precise timing across all 8 GMSL channels
- Buffer Management: Optimized memory allocation for sustained high-bandwidth operation
5. SDK Usage Guide
5.1 SDK Structure Overview
The SDK provides comprehensive tools for video injection operations. Extract the SDK and navigate to the working directory:
~/pcie_xdma_transfer_sdk/xdma
Directory Structure:
| Directory/File | Description |
|---|---|
bash | Shell script directory containing automated test scripts |
bash1 | Alternative shell script directory with additional test scenarios |
include | Header files directory |
xdma | Main XDMA driver source code directory |
tools/pcie_reg_rw | PCIe register read/write utility directory |
tools/pcie_xdma_transfer | Main video transfer utility directory |
Makefile | Build configuration file for SDK compilation and tools directory management |
5.2 SDK Compilation
Navigate to the SDK directory and compile:
~/pcie_xdma_transfer_sdk/xdma
make
5.3 Compilation Tools
Execute the following commands in the tools directory:
~/pcie_xdma_transfer_sdk/tools
make clean
make
5.4 Script Modification
Modify the transfer script located at: ~/pcie_xdma_transfer_sdk/bash
Edit the transfer_run.sh script to configure your specific requirements.
6. Video Transfer Configuration
6.1 Transfer File Naming Convention
Video source files should be placed in /bash/data/yuv directory. The transfer card requires specific file naming for proper channel mapping:
Syntax:
transfer_file_name[<n>]="<file name>"
Parameters:
transfer_file_name: Video source file name configuration<n>: Target card channel number (0-7)<file name>: Video source file name
Examples:
For channel 0 with video file named "input0.h264":
transfer_file_name[0]="input0.h264"
For channel 0 with video file named "picture19201080yuyv.yuv":
transfer_file_name[0]="picture19201080yuyv.yuv"
6.2 Transfer File Type Configuration
Specify the video file type for proper processing:
Syntax:
transfer_file_type[<n>]="<file type>"
Parameters:
transfer_file_type: Video file type configuration<n>: Target card channel number (0-7)<file type>: File type specification ("Original" or "H264")
Example:
transfer_file_type[0]="Original"
File Type Specifications:
- Original: Indicates direct transmission of uncompressed video files to the target card for format conversion to ACU
- H264: Specifies H.264 format transmission where CPU or GPU performs format conversion before sending to ACU
6.3 Transfer Repeat Count Configuration
Configure the number of times a file should be repeatedly transmitted:
Syntax:
transfer_file_replay[<n>]=<n1>
Parameters:
transfer_file_replay: File repeat count configuration<n>: Target card channel number (0-7)<n1>: Number of repetitions (0-1000000)
Example: For channel 0 to repeat 100 times:
transfer_file_replay[0]=100
6.4 Transfer Format Configuration
Configure the transmission format supported by the target card (YUV and RAW10, RAW12, RAW14):
Syntax:
transfer_type[<n>]="<model>"
Parameters:
transfer_type: Target card transmission format configuration<n>: Target card channel number (0-7)<model>: Target card transmission format ("YUV" or "RAW10" or "RAW12" or "RAW14")
Example: For channel 0 to transmit YUV422 format data:
transfer_type[0]="YUV"
6.5 Transfer Resolution Configuration
Configure the resolution for each channel's video stream by specifying width and height parameters:
Width Configuration:
transfer_resolution_width[<n>]=<n1>
Height Configuration:
transfer_resolution_height[<n>]=<n1>
Parameters:
transfer_resolution_width: Width resolution configurationtransfer_resolution_height: Height resolution configuration<n>: Target card channel number (0-7)<n1>: Image resolution value
Example: For channel 0 with resolution 1920×1080:
transfer_resolution_width[0]=1920
transfer_resolution_height[0]=1920
- Channel 0 requires 1-channel resolution configuration
- Channel 2 requires 3-channel resolution configuration
- Channel 4 requires 5-channel resolution configuration
- Channel 6 requires 7-channel resolution configuration
6.6 Internal and External Trigger Configuration
Internal Trigger Configuration:
../tools/reg_rw /dev/xdma0_user 0x30020 w <n1>
Parameters:
<n1>: 0x22222222 represents internal trigger, 0x11111111 represents external trigger
Example: For channel 0 operating in internal trigger mode:
../tools/reg_rw /dev/xdma0_user 0x30020 w 0x22222222
6.7 Internal Frequency Configuration
Configure the internal frequency for video transmission:
../tools/reg_rw /dev/xdma0_user <n> w <n1>
Parameters:
<n>: Target card channel number<n1>: Frequency value, where the actual frequency = 200M/configured frequency value
Channel Mapping:
0x30024→ Channel 00x30028→ Channel 10x3002c→ Channel 20x30030→ Channel 30x30034→ Channel 40x30038→ Channel 50x3003c→ Channel 60x30040→ Channel 7
Examples:
Set channel 0-7 to 30fps transmission:
#1fps
#30fps: 6666666
#20fps: 10000000
#15fps: 13333333
#10fps: 20000000
../tools/reg_rw /dev/xdma0_user 0x30024 w 6666666
../tools/reg_rw /dev/xdma0_user 0x30028 w 6666666
../tools/reg_rw /dev/xdma0_user 0x3002c w 6666666
../tools/reg_rw /dev/xdma0_user 0x30030 w 6666666
../tools/reg_rw /dev/xdma0_user 0x30034 w 6666666
../tools/reg_rw /dev/xdma0_user 0x3003c w 6666666
../tools/reg_rw /dev/xdma0_user 0x30040 w 6666666
7. Driver Loading and System Startup
7.1 Driver Loading
Navigate to /pcie_xdma_transfer_sdk/bash directory and execute the driver loading script:
sudo ./load_driver.sh
Expected Output:
interrupt_injection: 0
Loading driver: insmod xdma.ko interrupt_mode=1 ...
The kernel module installed correctly and the xdma devices were recognized.
DONE
After successful loading, you should see the following device files created in /dev/:
xdma0_h2c_0,xdma0_h2c_1,xdma0_h2c_2,xdma0_h2c_3- Host-to-card transfer devicesxdma0_c2h_0,xdma0_c2h_1,xdma0_c2h_2,xdma0_c2h_3- Card-to-host transfer devicesxdma0_user- User control interface for register access
7.2 Target Card Data Transmission Configuration
7.2.1 Start Configuration
Navigate to: ~/pcie_xdma_transfer_sdk/bash and execute the transfer script:
sudo ./transfer_run.sh
7.2.2 Stop Configuration
To stop the data transmission, navigate to: ~/pcie_xdma_transfer_sdk/bash and execute:
sudo ./stop.sh