Robotic Camera Solutions
Humanoid Solution Based Jetson AGX Thor
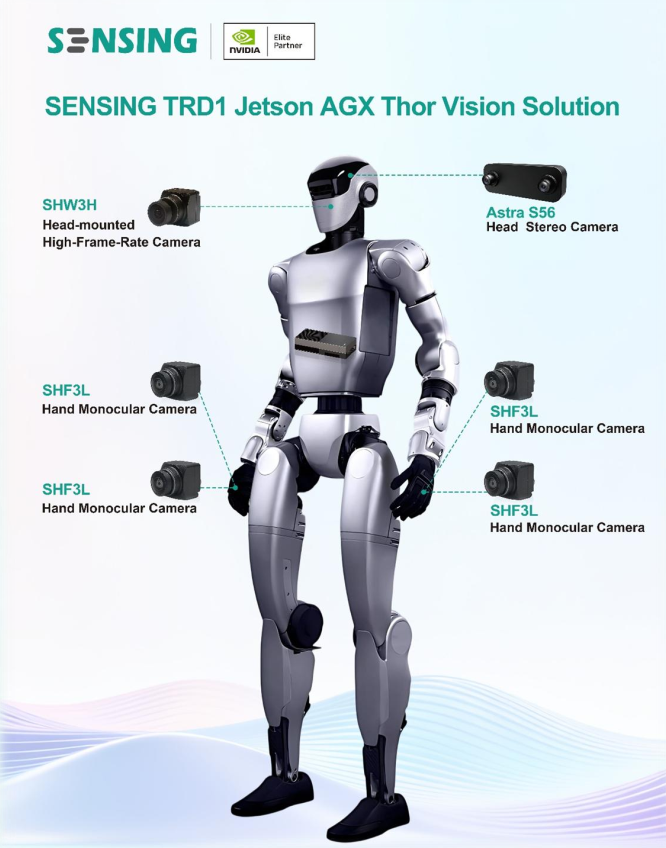
The SENSING TRD1 Jetson AGX Thor Vision Solution is a premier visual perception platform engineered by SENSING specifically for Embodied AI and humanoid robotics.
As an NVIDIA Elite Partner, SENSING integrates its proprietary high-performance camera modules with the latest NVIDIA Jetson AGX Thor computing platform to deliver a comprehensive, end-to-end solution—from sensing to computing.
Leveraging advanced multi-sensor fusion technology (featuring stereo cameras, high-frame-rate monocular cameras, and hand-mounted cameras), this system empowers robots with precise spatial localization, robust environmental perception, and fine manipulation guidance. It is perfectly tailored to meet the complex interactive and computational demands of next-generation humanoid robots.
System Architecture
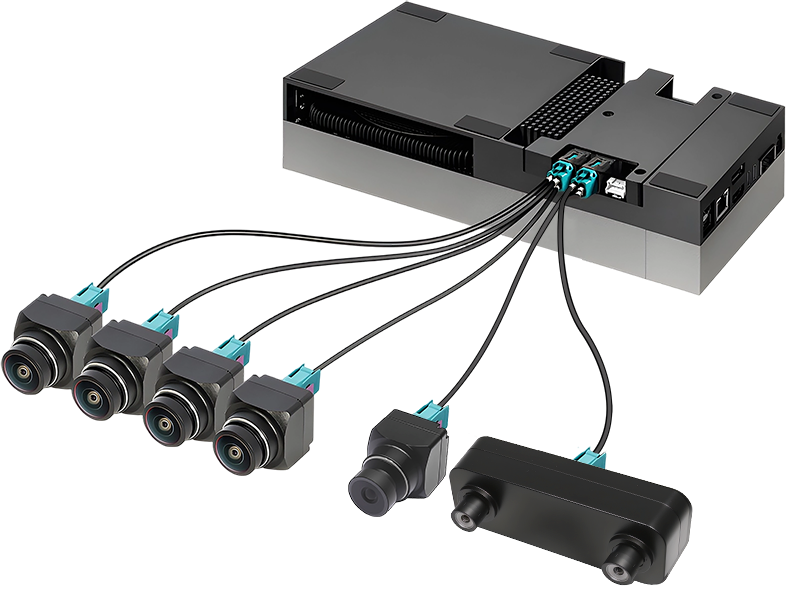
The solution features a centralized high-performance computing unit connected to a distributed network of vision sensors. To ensure industrial-grade reliability, ultra-low latency, and high bandwidth, all camera modules are linked to the computing platform via GMSL interfaces.
Component Topology
- Core Computing (SOC)
- NVIDIA Jetson AGX Thor Developer Kit
- SENSING TRD1 G2A Carrier Board(SG8-AGX-Thor-GMSL2)
- Head Vision
- Astra S56: 2 * 5MP Stereo Camera (Depth & VLA)
- Astra S36 (Optional): 2 * 3MP Stereo Camera (Alternative Depth Solution)
- SHW3H: 3MP HDR 60fps Monocular Camera
- Hand Vision
- SHF3L (×4): 3MP HDR 30fps Monocular Camera
Camera Configuration
| Model | Type | Resolution | Shutter | Data Format | FOV (H) | Role / Position | Qty | Docs |
|---|---|---|---|---|---|---|---|---|
| Astra S56 | Stereo | 2 * 5MP | Global | RAW | 120° | Head: Depth & VLA | 1 | View Specs |
| Astra S36 (Optional) | Stereo | 2 * 3MP | Rolling | YUV | 120° | Head: Depth (Alt) | 1 | View Specs |
| SHW3H | Monocular | 3MP | Rolling | YUV | 120° | Head: HDR 60fps Monocular Camera | 1 | View Specs |
| SHF3L | Monocular | 3MP | Rolling | YUV | 190° | Hands: HDR 30fps Monocular Camera | 4 | View Specs |
Computing Platform
| Component | Model | Description |
|---|---|---|
| SOC | NVIDIA Jetson AGX Thor | Next-gen AI computer for humanoid robots. |
| Carrier Board | SENSING TRD1 G2A (SG8-AGX-Thor-GMSL2) | Supports up to 8x GMSL camera inputs with hardware sync. |
Quick Bring Up
Installation Steps
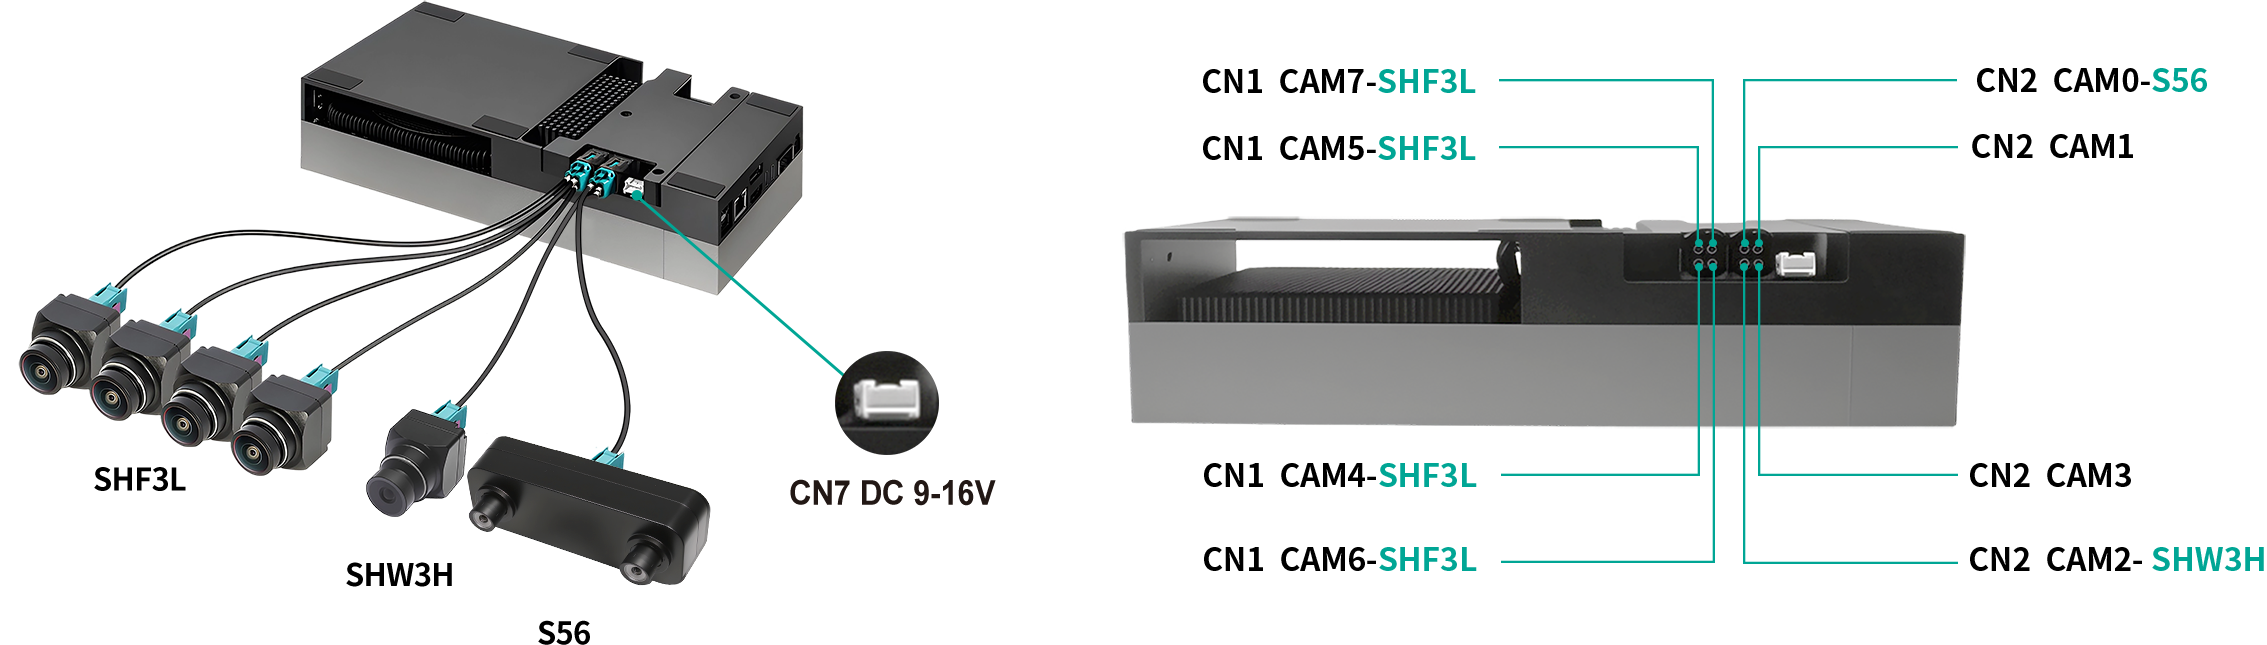
- Refer to the image labels and connect the GMSL cameras to the corresponding positions on the TRD1 G2A using coaxial cables.
- Connect "CN7" to the power supply(DC 9-16V)
- Power on the system(Jetson Thor)
SDK Download
Select the appropriate driver package based on your camera type and JetPack version:
| Camera Type | JetPack Version | Download Link |
|---|---|---|
| GMSL2 Camera (YUV) | JP7.0 | Download |
Copy the full link address to DownGit to download
Software Setup & Driver Configuration
This guide outlines the steps to configure the camera drivers, install the kernel, and verify the video stream for the SENSING TRD1 Vision Solution on Jetson AGX Thor.
1. Select Camera Configuration
Navigate to the driver directory and run the configuration script to select the connected camera modules.
# Enter the driver directory
cd TRD1_G2A_AGX_THOR_GMSL2x8_JP7.0_L4TR38.2

# Run the generation script
python3 generate_camera_overlay.py
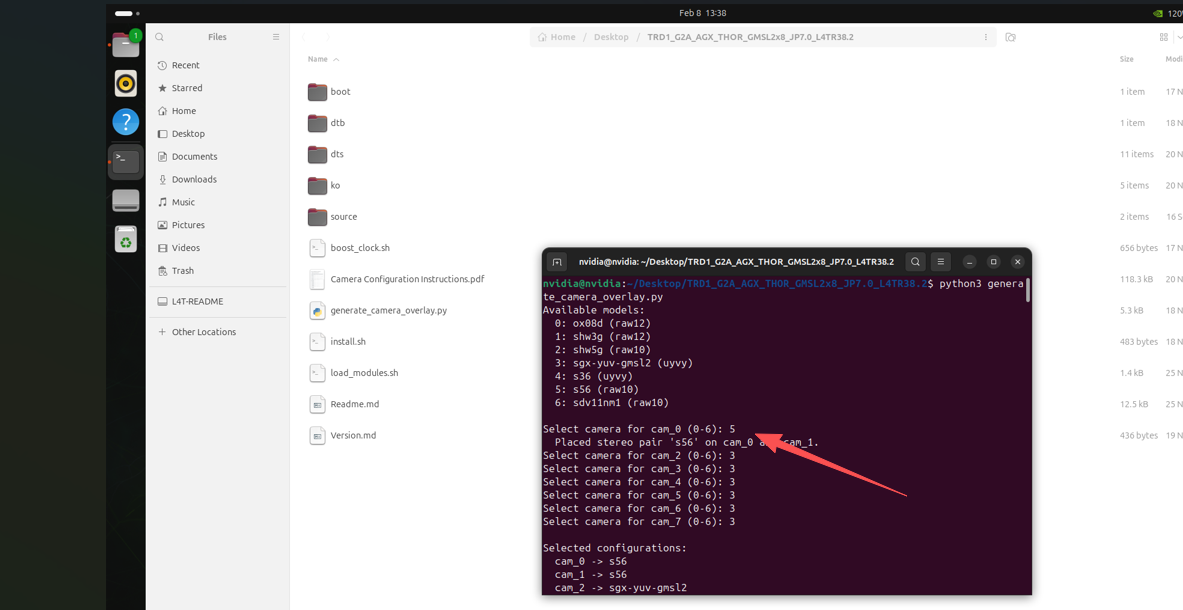
Action Required: Select the corresponding camera model based on the hardware port connection shown in the terminal prompt.
2. Install Kernel & Drivers
Install the kernel image and the kernel modules (.ko files) corresponding to your selected cameras.
# Grant execution permissions and install
chmod a+x ./install.sh
./install.sh
3. Configure Device Tree (Jetson-IO)
Use the NVIDIA Jetson-IO tool to configure the CSI connector for the Sensing hardware.
sudo /opt/nvidia/jetson-io/jetson-io.py
Follow these steps in the UI:
- Select "Configure Jetson AGX CSI Connector".
- Select "Configure for compatible hardware".
- Select "Jetson Sensing SG8A_AGTH_G2Y_A1 GMSL2x8".
- Select "Save pin changes".
- Select "Save and reboot to reconfigure pins".
The system will reboot to apply the changes.
4. Configure Trigger Mode
After rebooting, modify the load_modules.sh script to set the correct trigger mode and synchronization settings.
Edit load_modules.sh:
Ensure the script includes the following v4l2-ctl configurations (Setting sensor_mode=1 and trig_mode=0 for slave mode):
# ... existing code ...

# Configure sensor mode and trigger settings
v4l2-ctl -d /dev/video0 -c sensor_mode=1,trig_pin=0x00020007,trig_mode=0
v4l2-ctl -d /dev/video1 -c sensor_mode=1,trig_pin=0x00020007,trig_mode=0
v4l2-ctl -d /dev/video2 -c sensor_mode=1,trig_pin=0x00020007,trig_mode=0
v4l2-ctl -d /dev/video3 -c sensor_mode=1,trig_pin=0x00020007,trig_mode=0
v4l2-ctl -d /dev/video4 -c sensor_mode=1,trig_pin=0x00020007,trig_mode=0
v4l2-ctl -d /dev/video5 -c sensor_mode=1,trig_pin=0x00020007,trig_mode=0
v4l2-ctl -d /dev/video6 -c sensor_mode=1,trig_pin=0x00020007,trig_mode=0
v4l2-ctl -d /dev/video7 -c sensor_mode=1,trig_pin=0x00020007,trig_mode=0

green_print "Load modules done."
5. Load Drivers
Execute the modified script to load the drivers and apply settings.
sudo ./load_modules.sh
6. Install Argus Camera Tools
Install the NVIDIA Multimedia API and compile the Argus camera samples.
# Update and install dependencies
sudo apt update
sudo apt-get install nvidia-l4t-jetson-multimedia-api
cd /usr/src/jetson_multimedia_api/argus/
sudo apt-get install cmake build-essential pkg-config libx11-dev libgtk-3-dev libexpat1-dev libjpeg-dev libgstreamer1.0-dev

# Build the samples
sudo mkdir build && cd build
sudo cmake ..
sudo make -j8
sudo make install
7. Restart Argus Daemon
Restart the nvargus-daemon to ensure the ISP recognizes the new configuration. This is critical for RAW cameras.
sudo service nvargus-daemon stop
export NVCAMERA_NITO_PATH=CONFIG
sudo -E enableCamInfiniteTimeout=1 nvargus-daemon
(Keep this terminal open if running in foreground, or run in background)
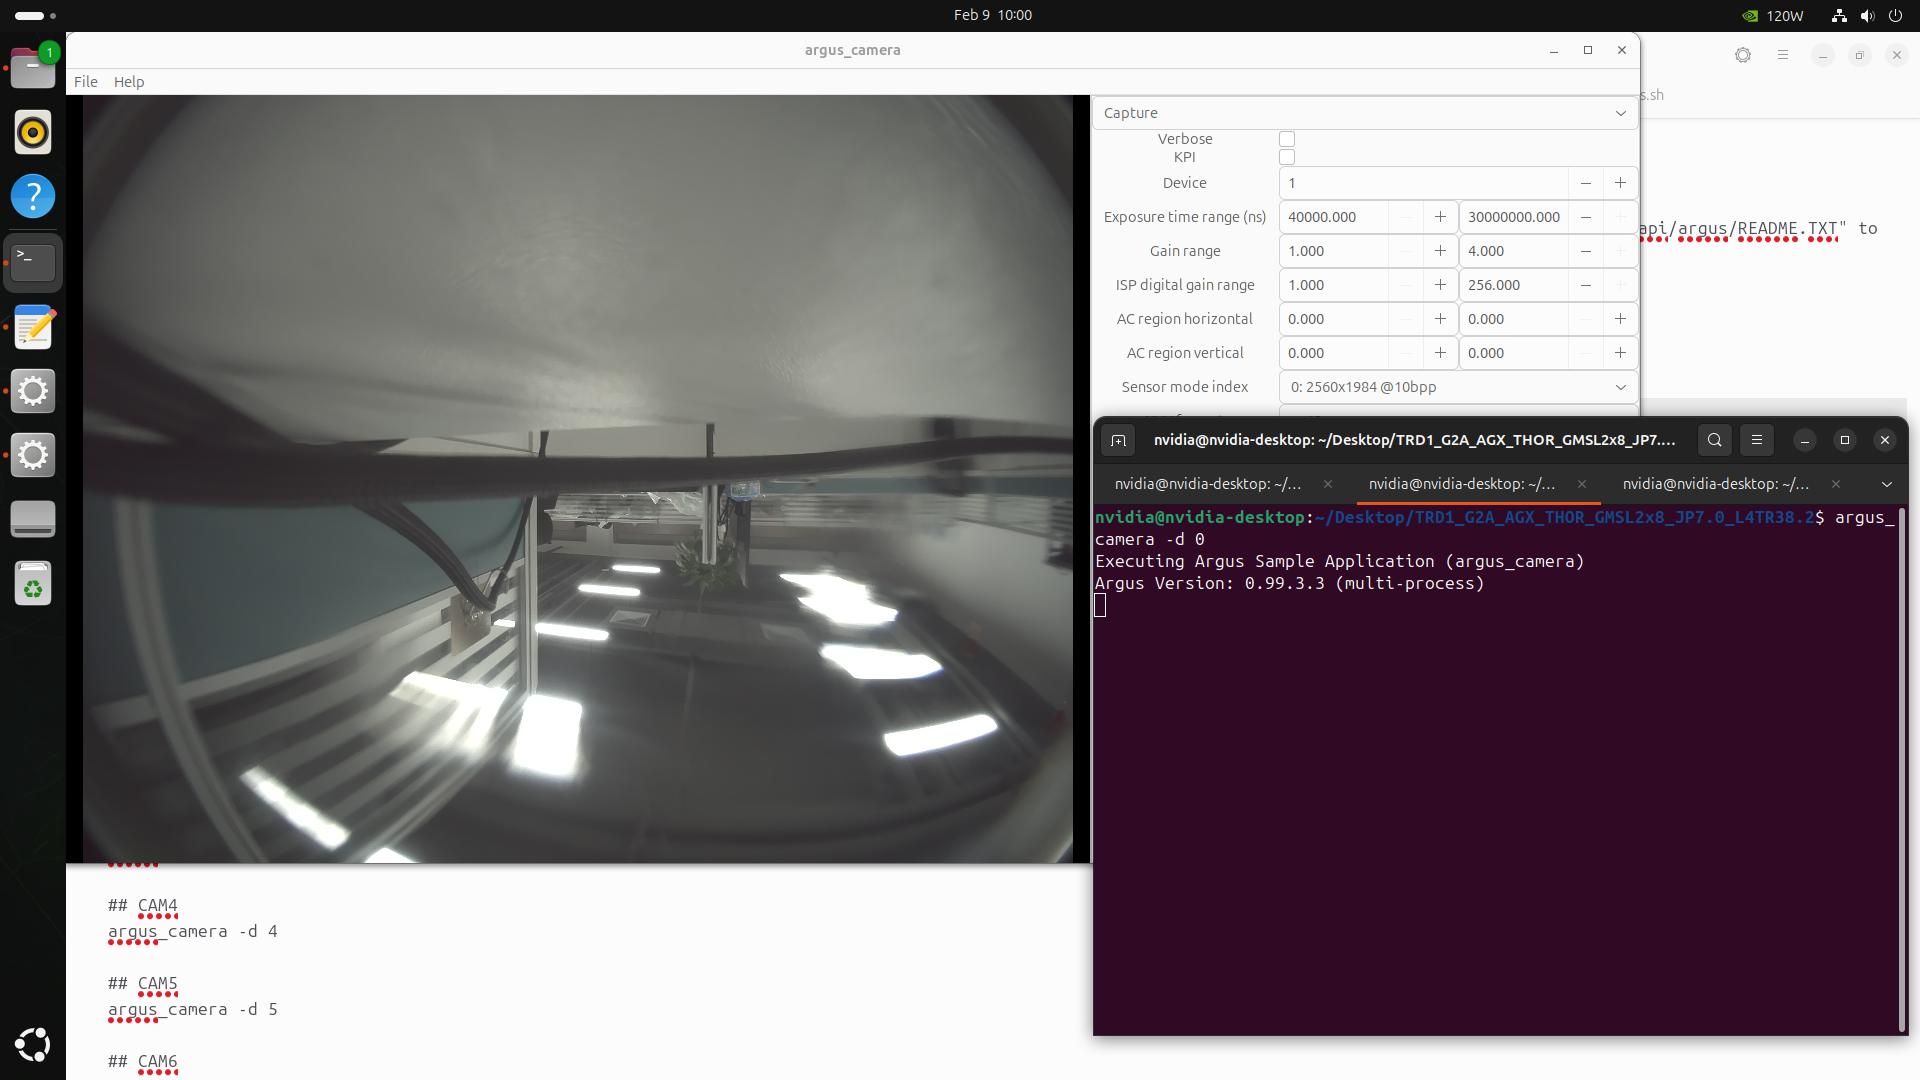
8. Verification & Live Stream
8.1 Testing Astra S56 (Stereo/RAW)
The S56 connects via RAW interface. Use argus_camera to view the stream.
# View Camera 0
argus_camera -d 0

# View Camera 1
argus_camera -d 1
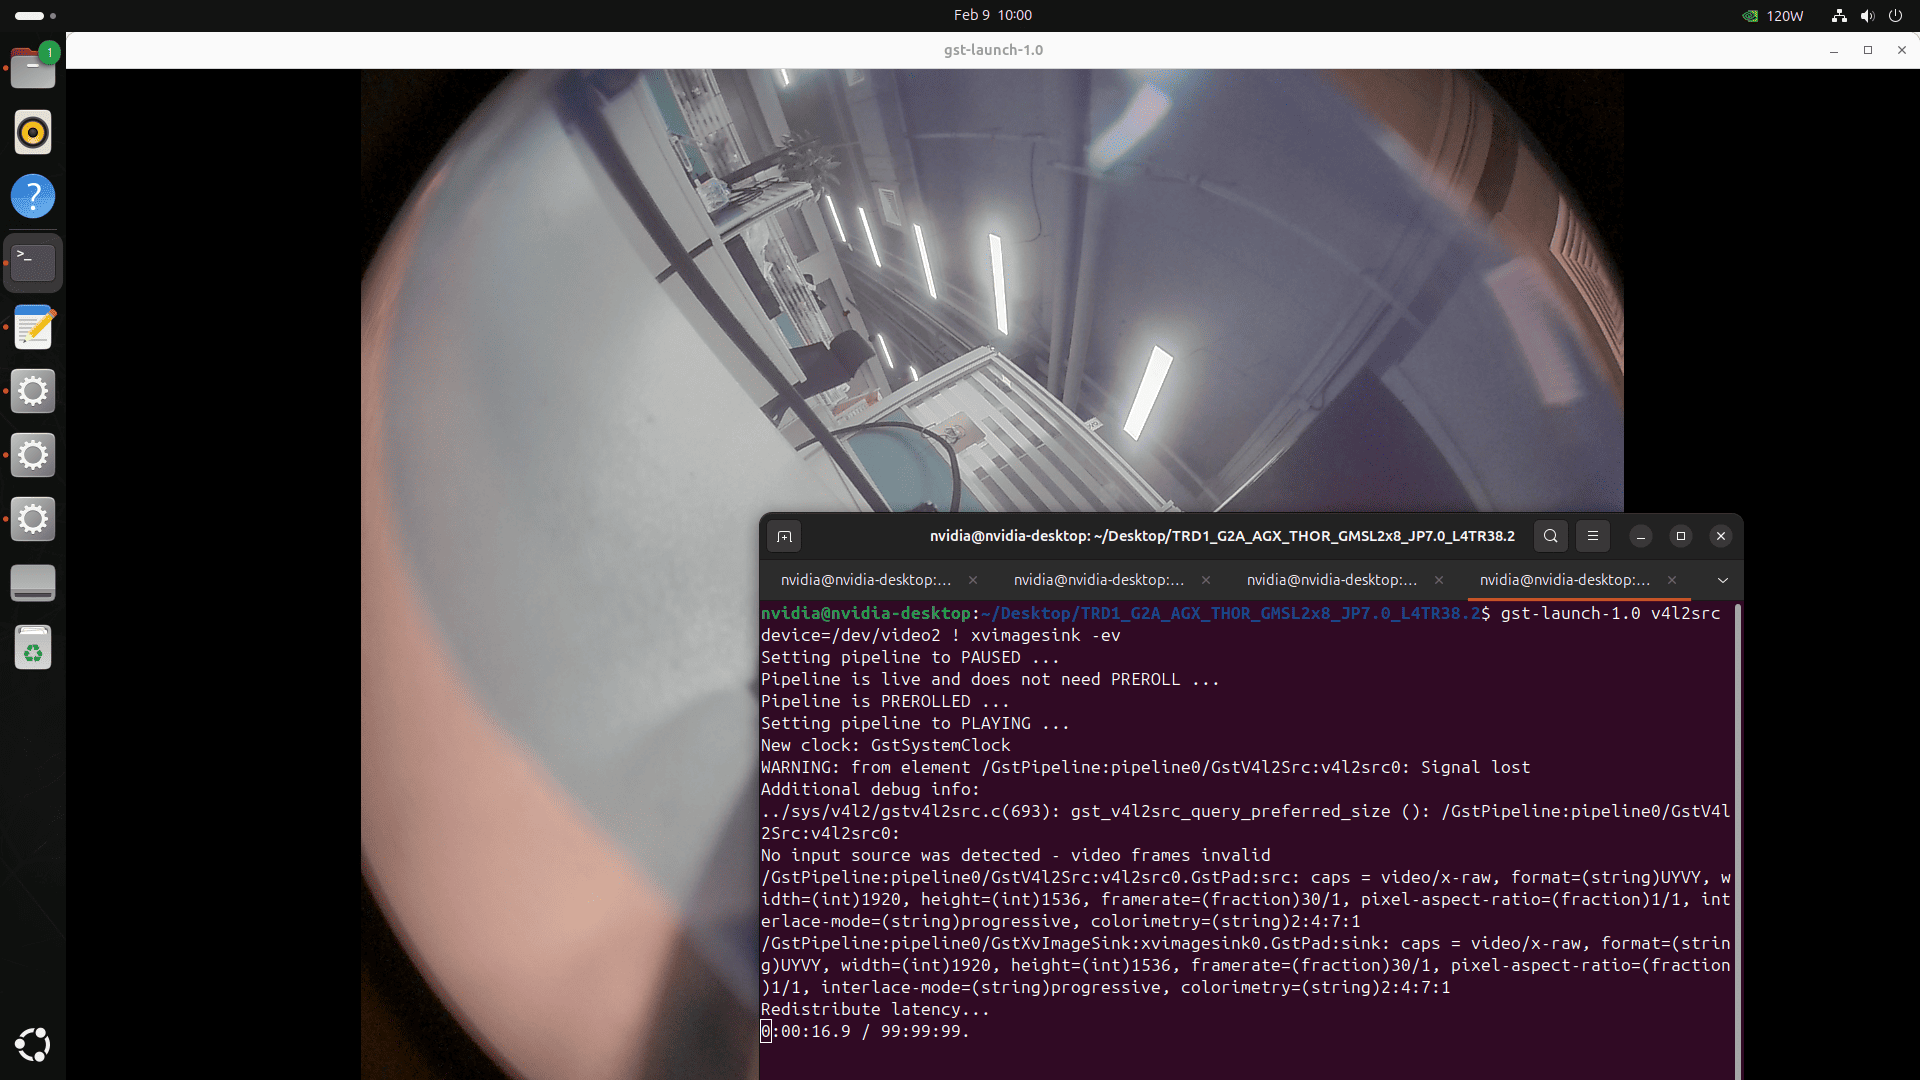
8.2 Testing SHW3H & SHF3L (Monocular)
Use GStreamer to verify the SHW3H and SHF3L cameras. Replace /dev/videoX with the appropriate node.
Example Command:
gst-launch-1.0 v4l2src device=/dev/video2 ! xvimagesink -ev
Full Command List for All Ports:
## CAM0
gst-launch-1.0 v4l2src device=/dev/video0 ! xvimagesink -ev

## CAM1
gst-launch-1.0 v4l2src device=/dev/video1 ! xvimagesink -ev

## CAM2
gst-launch-1.0 v4l2src device=/dev/video2 ! xvimagesink -ev

## CAM3
gst-launch-1.0 v4l2src device=/dev/video3 ! xvimagesink -ev

## CAM4
gst-launch-1.0 v4l2src device=/dev/video4 ! xvimagesink -ev

## CAM5
gst-launch-1.0 v4l2src device=/dev/video5 ! xvimagesink -ev

## CAM6
gst-launch-1.0 v4l2src device=/dev/video6 ! xvimagesink -ev

## CAM7
gst-launch-1.0 v4l2src device=/dev/video7 ! xvimagesink -ev
Notes
- Ensure all cameras are properly connected via coaxial cables before initializing the board.